


This article is intended to be a straightforward guideline for installing a brand-new kitchen backsplash using real glass mosaic tiles. So let's dive into it!

Tools & Materials
> Tiles
> Grout
> Rubber grout float
> Bucket and sponge
> Painter's tape
> Tape measure
> Mortar/Adhesive
> V-notched trowel
> A pair of scissors
Before Installing
Make sure the wall is dry and firm enough to hold the tile weight.
Prepare the wall: clean, take the measurements to determine the number of mosaic sheets needed (add 10% to account for waste), and repair any damaged on the surface. The same process works for field tiles such as ceramic or glass subway tiles.

Inspect the tiles for any imperfections before installing.
Use a square and a level to draw gridlines to ensure straight and even installation. Use tape to mark installation area.
Step 1: Apply Mortar/Adhesive
Apply mortar/adhesive to the wall using the flat side of a v-notch trowel.Now, using the v-notched side, rake the mortar/adhesive to create ridges of the proper depth and size.

TIP
Never use Ceramic Tile Mastic for the installation of glass tile. Use a thinset modified with polymer or latex, compliant with ANSI 118.4 and recommended for glass or vitreous tile installation by the manufacturer. Mortar/adhesive dries quickly, so be careful and spread only as much adhesive as you can tile in about 10-15 minutes.
Step 2: Apply Mosaic Tile Sheets
Apply the mosaic tile sheets or field tiles to the wall. Begin your installation at the most visible part of the wall and work outwards from there. That is a safe way to ensure that the most visually exposed part of the wall is well centered.

Use a rubber grout float on the tiles to apply light and even pressure to ensure grip with the adhesive.

TIP
Before applying grout, make sure that the desired area is fully covered with tiles and that you have allowed the mortar/adhesive to set as the manufacturer recommends. Usually, it takes about 24 hours.
How about the electrical outlets? Check our guideline to get around electrical outlets when installing tiles here.
Step 3: Applying Grout
Apply the grout with the rubber grout-float working diagonally across the tile. Force grout into the joints until they are full. Use the grout-float to take off any excess grout. Allow the grout to set for 7-10 minutes (check manufacturer’s recommendation).
TIP
Use a premixed grout for a peace of mind getting the right consistence and to avoid any mess around the backsplash area.
Step 4: Cleaning
To remove excess grout, and clean any haze from the surface of the tile use a damp sponge. It is recommended the use of a proper sponge for tile jobs is due its rounded edges and texture. You can easily find it in any hardware or tile store.

Repeat the process, using clean water each time, until the tile surface is free of grout.

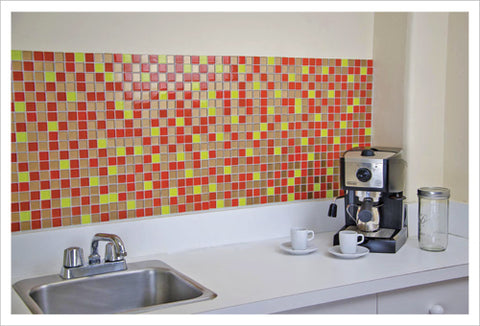
And there you have it: A brand new kitchen backsplash using real tiles!
Download our DIY Backsplash Kit Installation Guideline and Care for more tips and detailed installation instructions. Although the guideline is around a discontinued product, great advice, and pictures are waking you through the installation of mosaic backsplash tiles.